


Brush plaster is a craft plastering technique in which a fine-grained mortar or coating compound is applied and textured with a brush, broom, or quast. The resulting surface appearance ranges from fine matte to distinctly brushed and is used both indoors and outdoors. In the planning of refurbishment works, strip-out, and special demolition, brush plaster plays a role because it characteristically influences the substrate, can conceal defects, and often must be selectively removed or at least evaluated from a building physics standpoint before interventions in load-bearing components — for example with concrete demolition shears or hydraulic rock and concrete splitters — take place.
Definition: What is meant by brush plaster
Brush plaster is a thin-layer, predominantly mineral textured render that is typically applied in layer thicknesses of about 0.5 to 3 mm to sound substrates and textured with bristle tools. Depending on the binder (lime, lime-cement, cement, silicate, or synthetic resin) and the grain size, different surface qualities are created. Related executions are also referred to as brush render, broom finish, or brush-on render. Brush plaster serves to protect and design wall and ceiling surfaces, influences the diffusion capacity of components, and can determine substrate preparation for further construction and deconstruction work.
Properties and composition of brush plaster
Brush plaster is usually capillary-active and — in a mineral formulation — vapor-permeable. It consists of a binder, aggregates (fine sands, fillers), and water; organically bound variants include dispersions and additives. The grain size controls the relief, the layer thickness the appearance, and the type of binder the water uptake, strength, and renovatability. Lime-rich mixes are low-tension and suitable for historic substrates; cement-containing formulations are stronger in compression but stiffer. Silicate-bound systems adhere very well to mineral substrates. Synthetic resin-bound brush plasters are flexible and more dirt-repellent, but often less vapor-permeable.
Areas of application and surface appearances
Brush plaster is found in residential construction, existing-building refurbishment, and public construction, on façades and in interior spaces. It is suitable for leveling designs on masonry, concrete surfaces, lath bases, and reworked old plasters. In strip-out, brush plaster may be present on fair-faced concrete, on repair areas, or as a final layer on renovation plasters. Depending on the tool used, linear, circular, or cloudy textures are created. Fine brush strokes appear homogeneous and restrained, stronger broom strokes offer a robust, irregular texture.
Substrate and preparation
Substrate inspection is crucial, since brush plaster does not replace but rather presupposes load-bearing capacity. Loose layers, sintered layers, salt efflorescence, or chalking old coatings must be removed. Cracks and defects are closed with system-compatible fillers. On highly absorbent surfaces, mineral primers improve uniform water release. In the deconstruction context, it must also be clarified whether underlying components — e.g., reinforced concrete elements — need to be exposed before tools such as concrete demolition shears or hydraulic wedge splitters are used.
Substrate testing in practice
- Wipe and scratch test to assess chalking and strength
- Cross-hatch test in noncritical areas to estimate adhesion
- Wetting test to determine absorbency
- Spot exposure to identify layer build-up and potential contaminated sites
Application and execution
Application is carried out on flat, sound surfaces. The brush plaster is mixed, applied (roller, trowel, or quast), and textured while fresh with the brush. Work areas are set up to avoid laps. Edges and details (reveals, junctions) are planned in advance to achieve a uniform appearance.
Tools and mixes
- Quast/brush with medium bristle hardness for a uniform stroke
- Brushes of different widths for details and edges
- Trowel/float for drawing out thin coats
- Mixing tool with low air entrainment
Work steps
- Match primer to the substrate and allow to cure.
- Mix material to a homogeneous consistency, observe maturation time.
- Apply the first thin coat flat and even; if necessary, a second coat “wet-on-wet.”
- Texture while fresh, maintaining consistent pressure and direction.
- Drying with due consideration of temperature and humidity.
Building physics aspects
Mineral brush plaster is generally vapor-permeable and can buffer moisture. This has a positive effect on the indoor climate and supports drying in salt- and moisture-stressed buildings. Organically modified systems are more mechanically resistant, but must be carefully planned with regard to water vapor diffusion. Cracking often results from substrate movement or excessive layer thickness; it can be limited by low-tension formulations and correct application.
Repair, patching, and reworking
If brush plaster is damaged, it can be partially patched or reworked over the entire surface. Visual matching is important: bristle direction, tool, and mixing consistency are adapted to the existing finish. For salt-laden substrates, the root cause (moisture source) must be clarified before cosmetic measures. In heritage contexts, lime-bound mixes are preferred and test areas are created.
Repairing partial areas
- Neatly delineate loose areas, remove back to a sound edge
- Level the substrate, use a bonding primer if needed
- Replicate the existing texture and grain size
- Match color tone and surface sheen
Reworking instead of removing
If load-bearing capacity is sufficient, brush plaster can be leveled with thin skim coats and retextured. System compatibility (mineral on mineral, adhesion with organic systems) must be observed. On concrete surfaces that will later be opened with concrete demolition shears, reworking is often avoided and instead targeted exposure is performed.
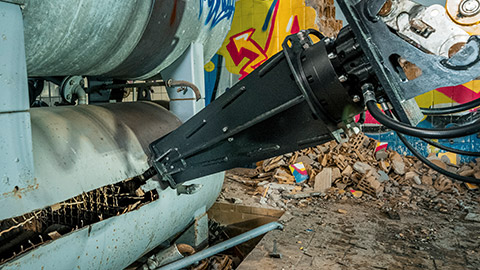
Removing brush plaster in strip-out and special deconstruction
In deconstruction, brush plaster is often the topmost layer before interventions in masonry or reinforced concrete. Its plaster removal serves visual inspection, pollutant investigation, and preparation for precise separation and demolition works. Depending on the substrate, binder, and layer thickness, different methods may be considered.
Manual and mechanical methods
- Manual: scraper, putty knife, brush — low emissions, high control
- Mechanical: grinding, milling, blasting — faster, increased dust and noise emissions
- Wet methods: low-dust, but observe drying times and moisture input
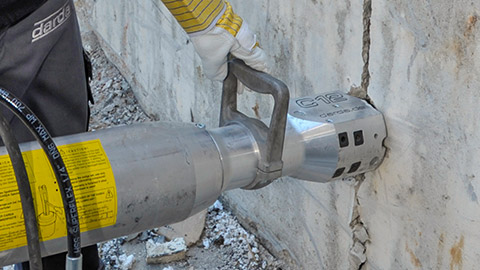
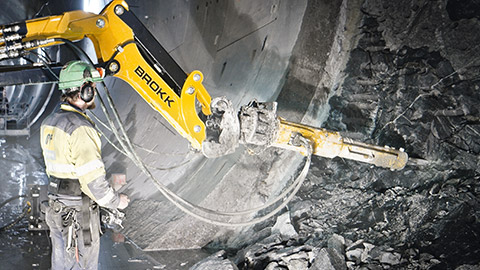
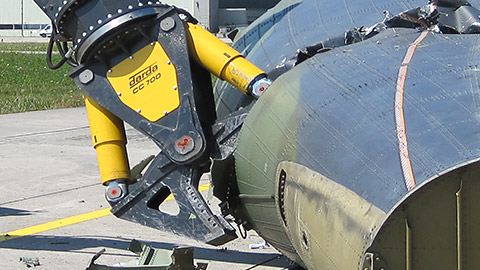
For load-bearing components, selective exposure is advisable to reveal reinforcement layers and crack zones. This facilitates the subsequent use of concrete demolition shears as well as the positioning of hydraulic wedge splitters for controlled separation cuts and splitting operations.
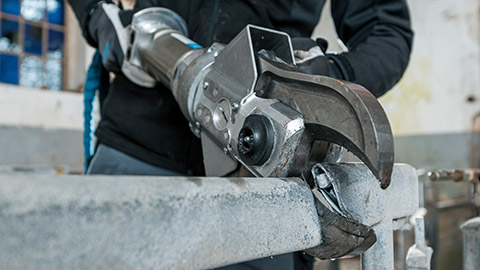
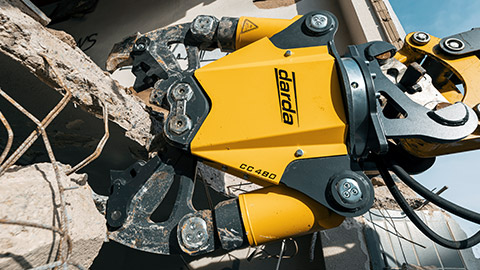
Interfaces with concrete demolition shears and hydraulic wedge splitters
- Expose edges and joints to create gripping points for concrete demolition shears
- Create clean bearing surfaces so splitting wedges of hydraulic wedge splitters seat securely
- Avoid interlayers that could impair force transmission during splitting
- Reduce spalling by removing brittle plaster edges beforehand
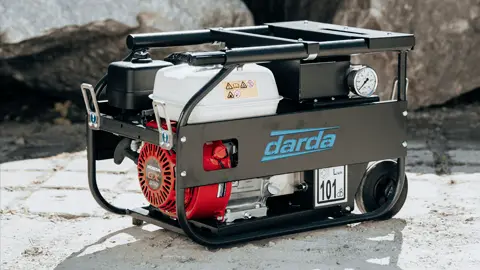
compact hydraulic power units supply concrete demolition shears and hydraulic wedge splitters with power. A clean, plaster-free contact zone improves precision and reduces unwanted collateral damage in adjacent plaster fields.
Sequence planning in demolition projects
- Investigation: clarify layer build-up, moisture, and any coatings
- Preparation: cover up, low-dust concept, dust extraction
- Selective removal of brush plaster in the intervention area
- Exposure of concrete/masonry and reinforcement
- Targeted use of concrete demolition shears or hydraulic wedge splitters
- Rework: smooth edges, remove residual plaster as required
Safety, health, and environment
Removing brush plaster generates fine dust that may contain quartz. Appropriate dust protection measures must be provided: source extraction, negative pressure containment in sensitive areas, personal protective equipment (respiratory protection, safety glasses). Noise exposure must be minimized. Disposal depends on the material: purely mineral plaster residues are handled differently than plaster-like organic coatings. For existing buildings, investigations for potential hazardous substance content are advisable. Legal requirements must be verified for the specific location and project; statements here are of a general nature.
Quality assurance and typical defects
- Cloudy appearance with heterogeneous absorbency — equalize with a primer
- Adhesion issues on smooth, dense substrates — use bonding bridges
- Cracks due to layers that are too thick — work in thin coats
- Visible lap marks — plan work areas, work “wet-on-wet”
- Chalking and powdering — match binder/substrate, consider carbonation
Brush plaster on concrete and masonry surfaces
On reinforced concrete, a finely textured brush plaster layer improves visual uniformity without significantly hindering diffusion, provided it is mineral. In the refurbishment process, the plaster layer can serve as an indicative layer: crack patterns become visible, damp patches show through. For interventions with concrete demolition shears, prior exposure of the edges is advisable. When splitting stone and concrete, plaster residues in the area of drill or wedge points must be removed so that forces are introduced without losses.
Planning, quantity takeoff, and cost efficiency
For the tender, layer thickness, binder type, grain size, color tones, and texture requirements must be specified clearly. For deconstruction items, areas, layer build-up, desired exposure depth, and boundary conditions (dust, noise, vibration) are defined. In the context of strip-out and cutting, careful surface preparation often shortens subsequent steps with hydraulic tools, because gripping surfaces are clearly defined and rework is minimized.
Standards, guidelines, and technical notes
In Germany, rules for plastering and stucco work and technical bulletins of relevant expert bodies apply to plastering work. In addition, occupational safety and environmental regulations apply to deconstruction and demolition works. These notes are general in nature and do not replace a project-specific review. Decisive factors are substrate condition, load case, and the coordinated approach of the trades involved.
Interfaces with other tools and work steps
In addition to concrete demolition shears and hydraulic wedge splitters, depending on the construction task, combination shears, Multi Cutters, or specific shears for separating built-in components are used. While the superficial brush plaster is not a load-bearing element, it does influence the visibility and accessibility of edges, joints, and embedded components. A well-thought-out sequence — first making structures visible, then targeted cutting and splitting — increases process reliability.
Practice-oriented guidelines for handling brush plaster in deconstruction
- Existing-condition analysis: clarify layer build-up, moisture, load-bearing capacity, and any coatings
- Selective removal where precise shearing or splitting operations will follow
- Define dust and vibration management early
- Keep contact zones for hydraulic tools clear and clean
- Quality assurance via mock-up areas and documented checkpoints
This page may be cited in commercial and non-commercial publications (e.g., specialist publications, forums, or social media) without prior permission.
Please feel free to copy the following link for your quote.