


A wall bracket is a fastening element that safely carries loads on a vertical surface and transfers them into the base material via anchors subjected to tension and shear. In professional deconstruction, during building gutting as well as in rock excavation and tunnel construction, wall brackets perform a wide range of tasks: from a temporary attachment point for lines, hoses and controls of hydraulic tools, through orderly media routing, to the permanent storage of heavy attachments in the workshop. Especially around concrete demolition shear and hydraulic rock and concrete splitters, smart wall bracket planning enables a safe, efficient, and well-structured workflow. In addition to pure load transfer, well-placed brackets support risk control, reduce setup times and improve ergonomics along work paths.
Definition: What is meant by a wall bracket?
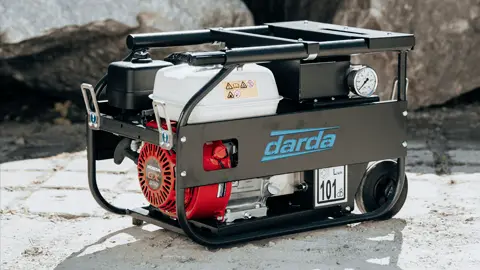
A wall bracket is understood to be a load-bearing fastening solution consisting of a console, retaining brackets, support rails or anchor plates that is anchored in concrete, masonry or natural stone via suitable dowel or anchor systems. It serves to safely take up dead weight and, depending on the application, live, vibratory or impact loads. In technical deconstruction, wall brackets are used both temporarily (e.g., for hose and cable management, dust extraction or spray mist systems, control boxes of a hydraulic power unit) and permanently (e.g., for the orderly storage of shears, cutters, cylinders and adapter plates). In demanding environments, the selection of geometry, materials and fasteners follows the intended use, the ambient conditions and the required inspection concept over the service life.
Design types and applications
Wall brackets can be adapted in design and purpose to the respective task. For professional use, the following basic forms are common:
- Consoles and angle brackets: Made of steel or aluminium, for taking higher loads with a small cantilever, often with slotted holes for on-site fit.
- Support rails/rail systems: Flexibly configurable, with carriages, clamps and clips for routing lines, hose bundles, control lines or splash guard components.
- Holding rings and hoops: For hose and cable management, relieve couplings on hydraulic power packs and tools.
- Anchor plates: Thick plates with defined hole geometry for point loads and as an interface to special clamps.
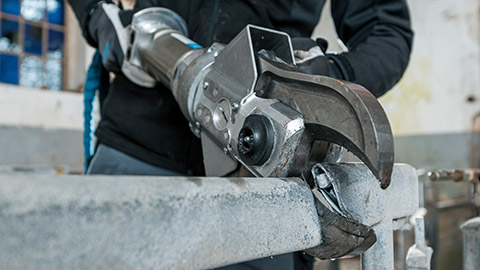
- Equipment holders: Form-fitted mounts for storing concrete demolition shear, stone hydraulic wedge splitter cylinders, Multi Cutters, combination shears, steel shear or cutting torch equipment in the workshop and service vehicle bay.
- Vibration-damped mounts: Brackets with elastomer elements to reduce transmission of tool-induced vibrations into walls and sensitive components.
In practice, these designs are combined. For example, support rails can create a variable base on which consoles for hydraulic controls and holding rings for hose bundles are arranged together. When working on wall and ceiling elements with concrete demolition shear, a pre-routed line guidance along the wall has proven effective to minimize tripping hazards and protect couplings from lateral tension. Additional guards, bump stops and labeling plates increase clarity and reduce damage from incidental contact.
Relevance in concrete demolition and special deconstruction
Wall work often produces dynamic effects: fluctuating forces when fragmenting elements, load impulses when breaking out individual segments, or vibrations from subsequent cutting processes. Wall brackets contribute to order and safety here:
- Media routing: Safe routing of hydraulic hoses, water or mist lines for dust suppression along load-bearing walls.
- Relief of sensitive components: Short paths, defined bend radii and strain relief increase the service life of couplings and hoses.
- Staging areas: Console for tool inserts or protective jaws of concrete demolition shear; holders for accessories of hydraulic wedge splitter equipment.
- Sight and movement spaces: Ordered wall routing keeps walkways clear and supports clear escape and work zones.
- Modularity and quick changeovers: Clearly arranged brackets accelerate tool changes and reduce idle times during sequential cutting and splitting.
For special deconstruction on heavily reinforced components, a robust bracket structure supports the coordinated approach: cutting, splitting, removal, intermediate storage. This keeps the material flow traceable, and coordination between tool operation and media supply succeeds without unnecessary interruptions. Defined parking positions for attachments and labeled connection points further stabilize the workflow under time pressure.
Technical design and load assumptions
The design of wall brackets depends on the base material, type of load and environmental conditions. In professional use, the following basic principles have proven themselves:
- Base material strength: Check load-bearing capacity and homogeneity of concrete, masonry or natural stone; observe edge distances and spacing.
- Define load cases: Consider dead load, live load, dynamic additions (vibrations, impact), temperature and moisture effects.
- Safety margins: Take into account suitable partial safety factors, load distribution assumptions and the direction of action of forces (tension, compression, shear, bending).
- Corrosion protection: Depending on location, galvanized, coated or stainless steel; note galvanic compatibility of combinations.
- Fire protection and temperature: Consider material parameters and holding performance at elevated temperatures when hot work takes place nearby.
- Documentation and marking: Mark load limits on the bracket, record anchor type and torque values, and archive test evidence in the project file.
- Serviceability: In addition to ultimate limit states, verify deflection, vibration behavior and clearance to prevent contact with moving tool parts.
Practice note: For brackets for hydraulic power packs or control boxes, a conservative design with reserves for changing accessory loads is advisable. For workshop holders for concrete demolition shear or Multi Cutters, consider impact loads during hanging and unhooking. Where frequent reconfiguration is expected, select hole patterns and rail profiles that allow tool-less adjustments.
Base materials and anchoring techniques
The choice of fastener follows the base material and the required load. Common are:
- Mechanical heavy-duty anchors: Expansion or undercut anchors for cracked and uncracked concrete, suitable for immediate loading.
- Injection/chemical anchors: For high loads, larger edge distances and problematic borehole environments; observe curing times.
- High-performance anchors for masonry: Special setting methods with sieve sleeves in perforated brick; low expansion forces, gentle on sensitive matrices.
- Special anchors for natural stone: Substrate-specific tests, as fabric and bedding govern load transfer.
- Solutions for lightweight substrates: Anchors and resin systems validated for lightweight concrete or hollow elements with controlled expansion.
Approvals and qualification
Use anchors and systems with recognized test evidence for the respective substrate and load direction. Observe installation categories, permissible load ranges and environmental classes specified in the documentation. For safety-relevant applications, define competence requirements for installers and keep training records available for audits.
Drilling and installation quality
Clean boreholes, defined drill diameters, depth markings, complete drill dust removal and correct tightening torque are decisive for load-bearing capacity. For chemical systems, temperature and humidity conditions and exact dosing are crucial.
- Cleaning sequence: Apply the blow-brush-blow sequence with suitable accessories until no dust escapes.
- Depth control: Use drill stop collars and verify effective anchorage depth with gauges.
- System integrity: Check expiration dates and batch numbers of resins, and perform test extrusions before use.
Installation: step by step
- Assess the base material, plan routing paths, determine loads.
- Define bracket geometry (console, rail, anchor plate) and observe edge and spacing distances.
- Mark drilling patterns, drill, clean, set anchors; observe curing times for injection systems.
- Align the wall bracket, screw it down, document torques.
- Add inserts (hoops, rings, carriages), preload components, soften edges.
- Functional and visual inspection: fit, play, clearance, strain relief.
- Apply load markings and orientation labels, protect sharp edges with guards.
- Record installation data in the site log with position references, anchor types and acceptance date.
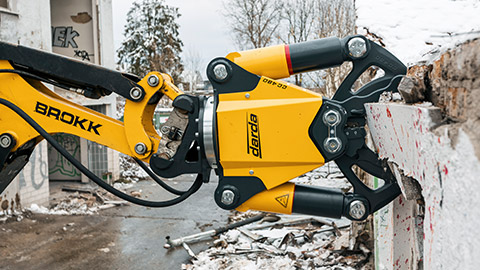
Interaction with hydraulic demolition tools
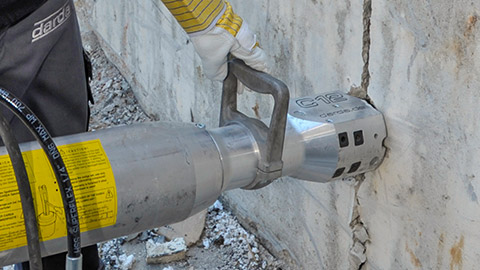
When using concrete demolition shear on wall and column elements, a modular wall bracket for hose bundles has proven itself. It maintains bend radii, prevents jamming at edges, and reduces the risk of pinch points. For hydraulic wedge splitter equipment for stone and concrete, a wall console supports orderly provision of splitting wedges, interlayers and measuring instruments. Hydraulic power packs can be media-decoupled via support-rail redirections so that the operating side remains freely accessible. Where cutting planes are close to routed media, install impact shields and heat-resistant sleeves to avoid incidental damage.
Example arrangement
- Support rail as main carrier at working height.
- Lateral consoles for control box and tool shelves.
- Holding rings for hose and cable bundles with defined strain relief.
- Locking pin or hoop for temporarily hanging tool attachments during changeover.
- Color-coded identification for pressure lines, return lines and water supply to prevent misconnections.
Use in building gutting and cutting
In building gutting, wall brackets are used for orderly routing of power and hydraulic lines and for fixing spray mist or dust extraction components. When cutting, separating and secondary breakage of components, free movement space is crucial. With a structured, wall-guided media organization, routes remain clear and cut paths do not collide with lines or control components.
Temporary brackets with protective caps and defined removal points help to sequence work phases: rough cut, targeted breaking, fine cutting. This reduces rework and the need to relocate lines during active operations.
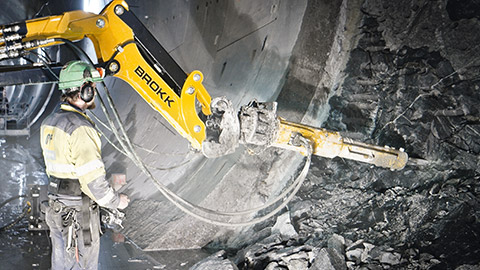
Rock excavation and tunnel construction
In tunnel construction and rock work, wall or route brackets are used for lighting, communication, water or compressed air lines as well as for hydraulic distributors. In combination with stone hydraulic wedge splitter cylinders, robust anchor plates help to safely route the media supply along the tunnel face. Corrosion-resistant materials and vibration-resistant connections are particularly important here. Additional requirements such as high ingress protection of housings, low-flame-spread cable supports and defined inspection intervals are to be integrated into the bracket concept.
Natural stone extraction and special applications
In quarries, simple but robust holding rings and consoles help to provide splitting tools and accessories in an orderly manner. In special applications, such as overhead work or in tight shafts, compact wall brackets make it easier to safely place tools such as combination shears, steel shear or cutting torch without obstructing routes. Dust, abrasion and temperature fluctuations require materials and surface treatments that maintain function under rough handling.
Workshop and storage: order, ergonomics, protection
For the workshop, a wall-based tool logistics is advisable: equipment holders with form supports prevent edge damage, drip zones under the brackets protect floors from hydraulic fluid drips, and labeled shelves reduce search times. Concrete demolition shear benefit from holders that transfer the dead weight close to the wall and allow one-handed placement.
- Ergonomic spacing: Grasp zones between shoulder and hip height, sufficient finger clearance at grips.
- Surface protection: Rubberized interfaces at contact points prevent coating damage on tools.
- Process labeling: Clear tags for inspection dates, tool IDs and maximum loads support orderly maintenance.
Safety, inspection and documentation
- Regular visual inspection: Cracks, corrosion, loosened bolts, elongated slotted holes.
- Torque check: Retighten on a sampling basis and document, especially after vibrations.
- Load tests: Within the permitted range, with suitable test loads and packings.
- Edge and abrasion protection: Protective hoses and radiused corners at contact points for hydraulic lines.
- Change management: After incidents or modifications, reassess load assumptions and re-approve the bracket layout.
- Record keeping: Maintain a register of bracket locations, anchor types, torque values and inspection dates.
Legal and normative requirements may vary depending on the project. It is advisable to follow the recognized rules of technology, use suitable design bases, and seek expert advice if boundary conditions are unclear. Define inspection intervals based on load class, environment and frequency of dynamic actions, and make compliance auditable through concise documentation.
Avoid common mistakes
- Underestimated edge distances: Too close to edges or drilling in cracked zones weakens the base material.
- Missing corrosion protection: Unsuitable materials in humid or aggressive environments reduce service life.
- Overloaded brackets: Tool weights and additional loads (vibrations, impact) not sufficiently considered.
- Unfavorable hose routing: Radii too tight, missing strain relief, pinching at component edges.
- Insufficient verification: No calculation or missing proof of suitability for the chosen substrate and load direction.
- Poor interface planning: Brackets colliding with door swings, formwork or transport paths due to missing layout review.
Sustainability and deconstruction-friendliness
Modular wall brackets with detachable connections can be removed without residue after project completion or reused elsewhere. Reversible anchor solutions, bolted rail systems and robust multi-use components increase service life and reduce material use over the life cycle.
- Standardized hole patterns: Enable reuse of consoles and holders across projects.
- Durable finishes: Coatings matched to the environment reduce maintenance and replacements.
- Documentation for reuse: Record load class and history to safely redeploy components.
Planning and coordination
A clear separation of operating, transport and storage zones on the wall reduces interface conflicts. For projects with concrete demolition shear or hydraulic wedge splitter equipment, a media and bracket layout plan that maps walkways, hose lengths, connection points and emergency access is recommended. This keeps operations orderly, makes team communication easier, and increases occupational safety.
- Clash check: Verify clearance to openings, reinforcement zones and temporary shoring.
- Route hierarchy: Prioritize critical media lines with protected inner paths, assign secondary routes outside impact zones.
- Contingencies: Define backup attachment points for unexpected rerouting during operations.
This page may be cited in commercial and non-commercial publications (e.g., specialist publications, forums, or social media) without prior permission.
Please feel free to copy the following link for your quote.